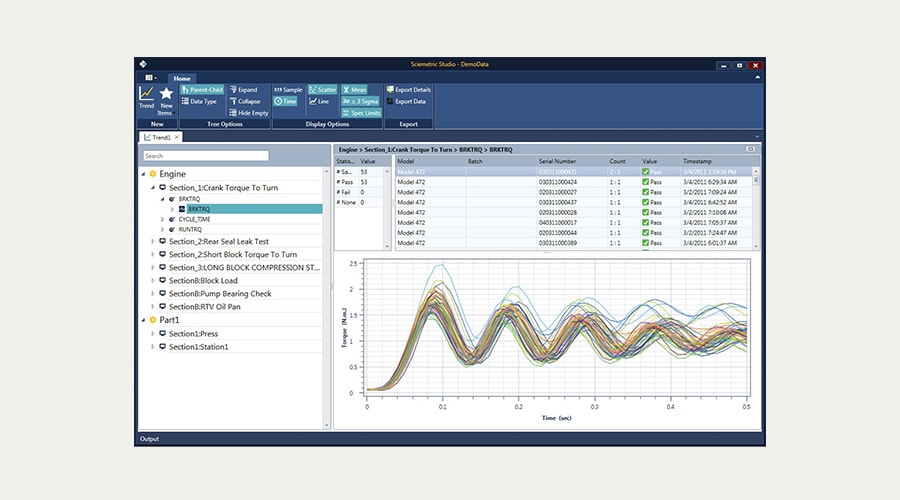
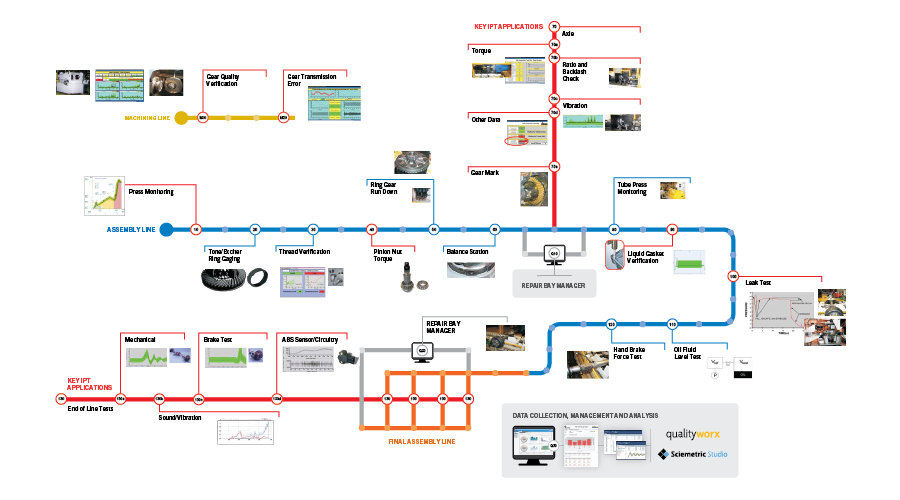
On a typical automotive axle manufacturing line there are at least 20 possible points, from subassembly to final test, where processes can be monitored or tested. Many drivetrain manufacturers aren’t monitoring each of these stations on their line, causing defects to go unnoticed—that is, until there is a costly recall.
Sciemetric’s axle manufacturing testing solutions allow you to catch defects and problems early in your production line. Monitor and analyze each key station in your process in real-time, reducing the overall cost and impact of a recall.
Monitor every step of the axle manufacturing process
Sciemetric's sigPOD is configurable to monitor virtually any test on your axle manufacturing line to ensure product quality and catch defects before they even reach the end of the line—all in one common solution across your plant. Key IPT applications include torque, ratio and backlash, sound and vibration, gear mark, and ABS sensor/circuitry.
- Machining Line: Gear quality verification, gear transmission errors
- Assembly Line: Press monitoring, tone/exciter ring gaging, thread verification, pinion nut torque, ring gear run down, balance station, tube press monitoring, liquid gasket verification, leak tests, oil fluid level, hand brake force
- Final Assembly Line: ABS sensor and circuitry, brake test, sound and vibration, mechanical, and other end of line tests
Process data from each station on the axle manufacturing line, including press-fit monitoring, leak testing, torque checks, liquid gasket verification, and more, is captured using the sigPOD and made available using our PSV (process signature verification) software or data intelligence tools for more details analysis and reporting.
Data intelligence on the production line
Sciemetric’s QualityWorX data intelligence software provides data collection and analysis across every production line in your enterprise. These tools enable complete traceability throughout the automotive axle manufacturing process. Go beyond standard data collection by creating reports that show all your parts meet quality standards—down to the components within the final assembly.
In-process verification catches defects in real-time
Process signatures provide the insight that visual inspections miss

Random visual and mechanical inspections conducted at the end of the line are insufficient at identifying faulty drivetrain parts. Something as simple as applying too little or too much force when inserting a bushing into a metal bracket can cause serious performance issues for the consumer. Without in-process axle manufacturing testing, these faults go unnoticed—that is, until there is a warranty claim.
By implementing Sciemetric technology, manufacturers can eliminate visual inspection and other unreliable end-of-line tests to measure assembly quality and access the data to prove it, in real-time.
Read the Application Note:
Axle Suspension Component Assembly
Consultation & support services
At Sciemetric, our relationship with our customers doesn’t end when the product ships. We are dedicated to making sure our customers know how to use their new equipment and software to its fullest and are seeing results using our solutions.
Sciemetric’s global application, installation, and support team has decades of expertise in data management and analytics, leak test, in-process test and more. We offer a wide range of services to help you optimize your process and make sure you are getting the most out of your technology investment.


