Contributed by: Sciemetric Staff

Press-fit or press force operations are very common on the manufacturing line where parts are inserted or joined using force. While it can be a fairly simple operation, there are a variety of variables that can cause problems during the process, leading to product quality defects. Issues such as incorrect orientation, improper insertion or alignment can cause leaks, unwanted noise vibration or otherwise affect the part’s performance. The goal is to catch these defects as they occur, not further down the production line or in the field, when they are more difficult and costly to fix.
Read on to learn how to use process monitoring matched with data analytics to improve defect detection during press operations.
What to monitor and measure during the press-fit operation
Process monitoring requires that the press station be equipped with the appropriate sensors and the digital process signature analysis software that can interpret and visualize that sensor data.
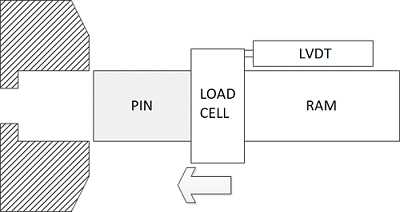
We can use a load cell to capture the force and a Linear Variable Differential Transformer (LVDT), as seen in image above, to digitize the distance as the ram forces the pin into place. This creates the force vs. time and distance vs. times curves. Combining these, we can create a force vs. distance waveform, or digital process signature.

These checks provide a more granular view of those three primary features: Force vs. Time, Distance vs. Time, and Force vs. Distance. These features tell us:
- Force vs. Time: How much pressure and for how long, had to be applied for the operation (or process cycle) to complete?
- Distance vs. Time: How far did the component move and how quickly, during the operation?
- Force vs. Distance: How much pressure did it require to move the component a specific distance?
Together, these features create a digital signature covering the critical elements of the pressing process.

Analyzing the data to catch defects during press-fit operations
The next step is to understand how the unique attributes of the signature, its shape, correspond to information about the real physical process.
In a press-fit operation that is error or defect free, the values for each of these checks will consistently fall into the same range. When they are visualized as a process signature, the signature will be repeatable. This means that the profile or signature of a “good” press-fit will be as distinct as a fingerprint. It doesn’t matter if the press machine in question is hydraulic, servo electric, pneumatic (air over oil), or mechanical.
Any anomaly will show up clearly in the signature as a deviation from this established norm. That makes it easy to determine accurate pass/fail in real time. Quality issues can be detected and action taken before the production line ends up with a pile of bad parts.
For example, using Sciemetric’s signature and data analysis, a manufacturer was able to detect that the chatter in their press-fit operation was due to spikes in force occurring as the pin rocked during the insertion.

Common feature checks for press-fit defect detection
Here are the common feature checks for press-fit with the defects that any deviation from the norm may indicate:
- Zero Force (the mean force before the parts come into contact): Worn or misaligned equipment or a worn load cell.
- Alignment Force (measures the maximum force when the parts come into contact and self-align): Misalignment of parts or fixture.
- Minimum Insertion Force (measures the minimum force after alignment and before the end of travel): Broken parts or loose-fitting parts.
- Maximum Insertion Force (measures the maximum force after alignment and before the end of travel): Tight-fitting parts or debris.
- Maximum Force (measures maximum overall force): Improper ram pressure, worn or faulty equipment.
- Insertion Work (measures total work applied to press the components together): Out-of-tolerance or broken parts, debris.
- Insertion Depth (measures maximum displacement): Out-of-tolerance parts, broken parts, debris or worn equipment.
Using this data for continuous improvement—at the station, and across the line
If you’re finding defects at leak test or end-of-line tests and want to be able to quickly trace the root source of the defect, the collective signature data from your press-fit station can also be archived and further analyzed. Using Sciemetric Studio, hundreds, thousands, even tens of thousands of files can be quickly overlaid to spot trends or patterns that may point to issues that haven’t yet manifested as outright fails or quality problems, enabling continuous improvement on your line.
Want to improve defect detection at your press operation? Contact us! Our specialists would be happy to discuss your application and solutions for improvement.

