Contributed by: Sciemetric Staff

sigPOD boosts repeatability and quality in valve tappet set application, cuts staffing and production costs
The valve tappet setting application can have a huge impact on the overall quality of an engine. If the valve tappets are not adjusted and tightened within precise parameters during manufacturing, it can cause premature wear and excessive engine noise during operation.
Such an issue can lead to warranty claims and costly repairs – if the affected units even get to consumers. For one automaker producing more than 1,700 units a day on its engine line, faulty engines weren’t even making it past the end-of-line hot test. This resulted in extensive, and costly, engine rework.
That rework revealed that the problem lay with errors in how tappets were being adjusted and tightened at the set and check stations. The conventional process involved a lot of manual effort, with several operators having to staff the station, using feeler gauges to help guide the setting of the tappet by hand. Relying so heavily on a subjective process for such a precise operation made it near impossible to achieve a repeatable set.
Achieving accuracy, eliminating guesswork
To eliminate the guesswork from this high-cost and precise production station, the manufacturer had Sciemetric install two sigPOD 1204 process monitoring systems. This allowed the manufacturer to collect and analyze digital process signatures from all tappets being tested at one time for quicker testing and communication.

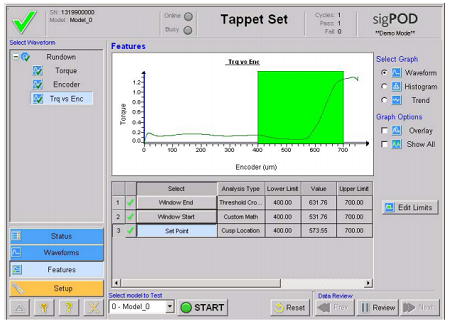
For setup, operators only had to run a few calibration tests on the tappet set station until the sigPOD determined the ideal tappet screw position for the part. Once ideal parameters were set, the sigPOD monitored the torque and angle measurements while the tappet screw was being turned. When the torque began to rise, this signalled to the sigPOD that the screw had made contact with the valve tappet. The sigPOD ended the screw operation when torque met the mark within the set limits.
With sigPOD and process signature verification software (see monitor screen), operators were able to control and maintain optimal limits on the test with minimal intervention, and track test results right on the test stand – even while the system monitored production – for real-time pass/fail feedback.
Continuous improvement
Next, the tappet set was inspected at the tappet check station. If the check found any problems, like a broken tappet or a tappet that had been over or under-screwed, adjustment parameters would be automatically fed back to the tappet set machine through the PLC to bring the gap closer to the desired nominal on the next tappet set operation. This check allowed for continuous improvement on the line.
The manufacturer took all this a step further by connecting the system to Sciemetric’s QualityWorX data management and analysis platform. This allowed all test data for each tappet set and check to be collected and stored for future reference, categorized by serial number. If a part failed at the end of the line or in the field, operators could quickly access and analyze this data archive to identify the problem part and adjust future tests immediately to prevent a reoccurrence.
Quality gains, enterprise-wide
After sigPOD and digital process signature analysis proved itself on this one assembly process, the automaker subsequently deployed sigPOD on over 50 in-process stations at three plants for key quality assurance steps such as leak testing, piston ring verification, crank torque-to-turn and piston stuffing.
By standardizing quality assurance on sigPOD, the automaker simplified maintenance and training, achieved full traceability across the enterprise and enabled simplified test development for continuous improvement throughout production.
Want to learn more about Sciemetric’s solution for this manufacturer’s tappet set application? Click here to read the full case study.

