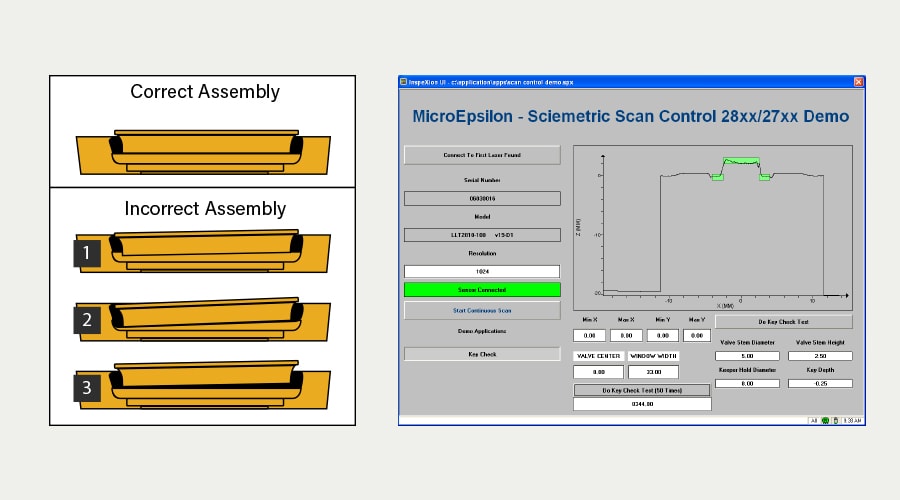
Real-time monitoring and advanced analysis of profile data
Profile inspection provides a simple, cost-effective alternative to machine vision systems to verify the presence of components, identify surface defects, detect incorrect assemblies or monitor planarity in flat parts. The use of digital process signature technology provides a picture of each part along with multiple points of measurement to deliver repeatable, fast and accurate pass/fail inspection.
Sciemetric’s non-contact profile testing uses a sigPOD to monitor lasers, linear encoders, and rotary encoders, capturing the full digital signature at a high speed. The sigPOD also enables real-time profile measurement and analysis of specific zones on a part, flexible measurement of parameters and statistics for smoothing the signals. Following are some examples of contact and non-contact profile testing applications.
What can be monitored:
- Part or seal presence
- Part or seal location and assembly flatness and verification
- Stack up tolerances
- Surface finish
Faults that can be determined:
- Improper assembly
- Missing components
- Defective components or stack ups.
Profile Measurement and Analysis Using Digital Process Signature Technology
Sciemetric's profile analysis uses digital process signatures to analyze critical dimensional attributes of a manufactured part or assembly, helping to ensure conformance to manufacturing specifications. Process signature analysis provides a visual representation of the measured assembly to simplify the process of verifying dimensionally complex parts.
During the operation, the sigPOD measures dimensional data from a laser profiler, probe, camera, air pneumatic gauging device, or other displacement sensor/encoder. The data can be normalized to a reference point or datum on the part or station, reducing the effects of measurement stack-up errors. Critical dimensions can be identified in the measured profile and compared to predefined specification limits.
Two or more dimensional measurements can be used to calculate new measurements, such as the slope of a surface, or the depth of a bore, for example. For more complex dimensions that can’t be represented by a single measurement, the data can be represented as a signature and evaluated against a previously measured nominal or master signature for conformance.
Only Sciemetric enables the reprocessing and overlay of process signatures to determine the root cause of issues with quick, accurate visual tools. Our technology provides real-time profiling and analysis in non-contact and contact profile inspection applications.
Contact Profile Inspection Using:
- Hand tools like dial indicators, digital calipers, micrometers
- Contact probes, or coordinate measurement machines (CMMs)
Non-Contact Profile Inspection Using:
- Pneumatic gauging, or air gauging
- Optical and vision-based systems, including lights, lenses and cameras
- Light-based systems using LEF or laser scanners
Note: Measurement tools require a compatible output to interface with the Sciemetric solutions, such as an analog output and/or a data interface. Contact us for a consultation to learn more.
Contact Profile Testing vs. Non-Contact Profile Testing
Contact profile testing uses probes or similar instruments to scan the surface of a part and find potential defects. Contact profiling is a better option when measuring transparent surfaces, or other surfaces that are problematic for non-contact devices. This method of profile testing is significantly slower in the collection of data points but provides a high level of accuracy. When measuring complex parts, it is critical to keep assumptions realistic, so your compensations are accurate.
Non-contact inspection uses a profile laser or similar technology to test a high volume of parts and components in an automated production line. Using a non-contact profiling method is ideal for electronics and other components easily damaged using contact testing methods, and overall requires less maintenance and calibration. Another benefit is that non-contact profile testing provides faster surface measurement, allowing for high sampling rates.
Both non-contact and contact profile testing are reliable methods of contour measurement and defect detection for applications including:
- Power steering
- Pump vane
- Gauging of notches
- Piston verification
- Piston ring verification
- Water pump
- Reluctor wheel
- Rff location
- Clutch roller bearing
- Thread verification
Profiling Application Stories

Laser profiling and profile signatures provide real results for OEM
A manufacturer of heavy equipment was experiencing issues with a major assembly and required an in-process test to detect improper assembly, missing components and component defects.
Using a single 2D scanning and image laser, Sciemetric collected the profile signatures for the part providing a reliable, real-time means to verify bearing seal part/seal presence, part/seal location and assembly flatness, and stack-up tolerances.
![]()
Precision finishing for advanced semiconductors
A manufacturer of sophisticated polishing pads used in the production of advanced semiconductors needed to verify the grooves on the grinding edges of these pads met spec for depth and spacing. Any imperfection can lead to expensive quality meltdowns when a semiconductor is installed in the end product.
Sciemetric delivered a laser profiling system to map the contours of the grinding surface. Sciemetric’s analysis software then identified any non-uniform surface characteristics. This enabled the manufacturer to boost the quality of its products and demonstrate to its customers the rigor of its testing and quality assurance process.
Take your profile test data one step further with QualityWorX
Explore how our QualityWorX suite of data management and manufacturing analytics software can consolidate non-contact and contact profile test data with all the rest of your production data, for continuous improvement and proactive “what if” analysis.
QualityWorX connects all of your device data and provides unique analytics tools that let you trend and analyze it—including the waveforms. Learn more about this practical approach to Manufacturing 4.0 that provide the tools to resolve issues quickly.

